Google Code Prettify

NPOI 中繪製Chart

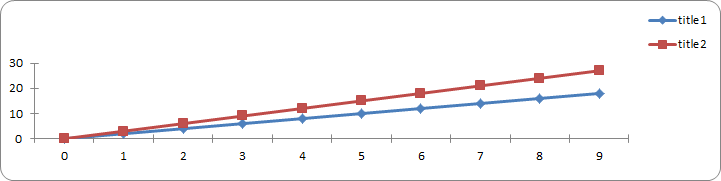
 NPOI 在新版本中增加了對圖表的有限支持(僅 xlsx 文件)

項目地址: https://github.com/tonyqus/npoi

支持折線圖和散點圖

來看demo :

1
2
3
4
5
6
7
8
9
10
11
12
13
14
15
16
17
18
19
20
21
22
23
24
25
26
27
28
29
30
31
32
33
34
35
36
37
38
39
40
41
42
43
44
45
46
47
48
49
50
51
52
53
54
55
56
57
58
59
60
61
62
63
64
65
66
67
68
69
70
71
const int NUM_OF_ROWS = 3;
      const int NUM_OF_COLUMNS = 10;
 
     static void CreateChart(IDrawing drawing, ISheet sheet, IClientAnchor anchor, string serie1, string serie2)
   {
       var chart = drawing.CreateChart(anchor) as XSSFChart;  
      //生成图例
       var legend = chart.GetOrCreateLegend();
  //图例位置
       legend.Position = LegendPosition.TopRight;
        
      //图表
       var data = chart.ChartDataFactory.CreateLineChartData<doubledouble>(); //折线图
  //var data = chart.ChartDataFactory.CreateScatterChartData<double, double>(); //散点图
 
       // X轴.
       var bottomAxis = chart.ChartAxisFactory.CreateCategoryAxis(AxisPosition.Bottom);           
       bottomAxis.IsVisible = false//默认为true 不显示  设置为fase 显示坐标轴(BUG?)
        
       //Y轴
       IValueAxis leftAxis = chart.ChartAxisFactory.CreateValueAxis(AxisPosition.Left);
       leftAxis.Crosses = (AxisCrosses.AutoZero);
       leftAxis.IsVisible = false//设置显示坐标轴
 
       //数据源
       IChartDataSource<double> xs = DataSources.FromNumericCellRange(sheet, new CellRangeAddress(0, 0, 0, NUM_OF_COLUMNS - 1));
        
       IChartDataSource<double> ys1 = DataSources.FromNumericCellRange(sheet, new CellRangeAddress(1, 1, 0, NUM_OF_COLUMNS - 1));
       IChartDataSource<double> ys2 = DataSources.FromNumericCellRange(sheet, new CellRangeAddress(2, 2, 0, NUM_OF_COLUMNS - 1));
        
       //数据系列
       var s1 = data.AddSeries(xs, ys1);
       s1.SetTitle(serie1);
       var s2 = data.AddSeries(xs, ys2);
       s2.SetTitle(serie2);
 
 
       chart.Plot(data, bottomAxis, leftAxis);         
        
   }
 
   static void Main(string[] args)
   {
       IWorkbook wb = new XSSFWorkbook();
       ISheet sheet = wb.CreateSheet("linechart");
 
       // Create a row and put some cells in it. Rows are 0 based.
       IRow row;
       ICell cell;
       for (int rowIndex = 0; rowIndex < NUM_OF_ROWS; rowIndex++)
       {
           row = sheet.CreateRow((short)rowIndex);
           for (int colIndex = 0; colIndex < NUM_OF_COLUMNS; colIndex++)
           {
               cell = row.CreateCell((short)colIndex);
               cell.SetCellValue(colIndex * (rowIndex + 1));
           }
       }
 
       IDrawing drawing = sheet.CreateDrawingPatriarch();
       //锚点
       IClientAnchor anchor1 = drawing.CreateAnchor(0, 0, 0, 0, 0, 5, 10, 15);
       CreateChart(drawing, sheet, anchor1, "title1","title2");
       IClientAnchor anchor2 = drawing.CreateAnchor(0, 0, 0, 0, 0, 20, 10, 35);
       CreateChart(drawing, sheet, anchor2, "s1""s2");
       using (FileStream fs =File.Create("test.xlsx"))
       {
           wb.Write(fs);
       }
 
   }


很多特性都還不支持,這是比較難受的.將就用吧


From: https://www.cnblogs.com/sstn/p/9435337.html

Easy Bootstrap Pagination for ASP.NET Gridview

 Bootstrap pagination for gridview with CSS only

Introduction

This post describes implementing bootstrap pagination for ASP.NET gridview with .table class of bootstrap CSS.

I was recently working with ASP.NET gridview in bootstrap template. Pagination is given in ul li format in bootstrap CSS in .pagination class. But ASP.NET gridview control dynamically takes pagination in a nested table. But after watching closely gridview pagination HTML tags, I found a simple solution.

That is nothing but modifying .table class which we use in gridviewGridview pagination row is within table and the current page number is kept within span control unlike other page links.

CSS Solutions: Modification of Table Class Not Pagination One

So here is the trick.

Put bootstrap CSS on header.

HTML
<link href="css/bootstrap.css" rel="stylesheet" />

Now, we need to modify pager in gridview write CSS rules for .table table - similar to ul li of .pagination class.

Something like this...

Add extra CSS for .table and nested table in it like below. These properties are taken from .pagination CSS.

C#
/*gridview*/
.table table  tbody  tr  td a ,
.table table  tbody  tr  td  span {
position: relative;
float: left;
padding: 6px 12px;
margin-left: -1px;
line-height: 1.42857143;
color: #337ab7;
text-decoration: none;
background-color: #fff;
border: 1px solid #ddd;
}

.table table > tbody > tr > td > span {
z-index: 3;
color: #fff;
cursor: default;
background-color: #337ab7;
border-color: #337ab7;
}

.table table > tbody > tr > td:first-child > a,
.table table > tbody > tr > td:first-child > span {
margin-left: 0;
border-top-left-radius: 4px;
border-bottom-left-radius: 4px;
}

.table table > tbody > tr > td:last-child > a,
.table table > tbody > tr > td:last-child > span {
border-top-right-radius: 4px;
border-bottom-right-radius: 4px;
}

.table table > tbody > tr > td > a:hover,
.table   table > tbody > tr > td > span:hover,
.table table > tbody > tr > td > a:focus,
.table table > tbody > tr > td > span:focus {
z-index: 2;
color: #23527c;
background-color: #eee;
border-color: #ddd;
}
/*end gridview */

Your gridview pagination class is ready.

Now, put this class in gridview like this:

C#
<asp:GridView ID="GridView1"
CssClass="table table-striped table-bordered table-hover"
   runat="server" PageSize="10"
   AllowPaging="true" ></asp:GridView>

Now, add this code in page load in code view to databind gridview:

C#
DataTable dt = new DataTable();
           dt.Columns.Add("Sl");
           dt.Columns.Add("data");
           dt.Columns.Add("heading1");
           dt.Columns.Add("heading2");
           for (int i = 0; i < 100; i++)
           {
               dt.Rows.Add(new object[] { i ,123*i, 4567*i , 2*i ,  });
           }

           GridView1.DataSource = dt;
           GridView1.DataBind();

Here is the output shown below:


from: https://www.codeproject.com/Tips/1085031/Easy-Bootstrap-Pagination-for-ASP-NET-Gridview


linQ異常的改善: 將 varchar 資料類型轉換成 datetime 資料類型時,產生超出範圍的值

會出現此問題主因是null值所致的問題,改善方法是將日期型態的資料增加null值的處理即可改善此問題。


Fix error: A possible object cycle was detected. This can either be due to a cycle or if the object depth is larger than the maximum allowed depth of 32. Consider using ReferenceHandler.Preserve on JsonSerializerOptions to support cycles.


In order to fix the error:


System.Text.Json.JsonException: A possible object cycle was detected. This can either be due to a cycle or if the object depth is larger than the maximum allowed depth of 32. Consider using ReferenceHandler.Preserve on JsonSerializerOptions to support cycles.


You have at least two options:


Avoiding circular references

Ignoring circular references

I’ll assume that option 1 (which is usually ideal) it’s not viable for you.


Option 2 is literally a little statement in the Startup class, in the ConfigureServices method (this is for ASP.NET Core 6+):


services.AddControllers().AddJsonOptions(x =>

                x.JsonSerializerOptions.ReferenceHandler = ReferenceHandler.IgnoreCycles);


If you use ASP.NET Core 5:


services.AddControllers().AddJsonOptions(x =>

   x.JsonSerializerOptions.ReferenceHandler = ReferenceHandler.Preserve);


If you are using ASP.NET Core 3.1 or less, you can do the following:

Install the library: Microsoft.AspNetCore.Mvc.NewtonsoftJson (install the corresponding version, if you have ASP.NET Core 3.1, you install version 3.1 of the library)


Then, in ConfigureServices:

services.AddControllers().AddNewtonsoftJson(x => 

 x.SerializerSettings.ReferenceLoopHandling = Newtonsoft.Json.ReferenceLoopHandling.Ignore);


修復不同版本的 ASP.NET Core 中“檢測到可能的對象循環”錯誤

為了修復錯誤:


System.Text.Json.JsonException: 檢測到可能的對象循環。這可能是由於循環或對象深度大於最大允許深度 32。考慮在 JsonSerializerOptions 上使用 ReferenceHandler.Preserve 以支持循環。


你至少有兩個選擇:


避免循環引用

忽略循環引用

我會假設選項 1(通常是理想的)對您來說不可行。


選項 2 實際上是 Startup 類中的一個小聲明,在 ConfigureServices 方法中(這是針對ASP.NET Core 6+):


services.AddControllers().AddJsonOptions(x =>

                x.JsonSerializerOptions.ReferenceHandler = ReferenceHandler.IgnoreCycles);

如果您使用ASP.NET Core 5:


services.AddControllers().AddJsonOptions(x =>

   x.JsonSerializerOptions.ReferenceHandler = ReferenceHandler.Preserve);

如果您使用的是ASP.NET Core 3.1 或更低版本,則可以執行以下操作:


安裝庫:Microsoft.AspNetCore.Mvc.NewtonsoftJson(安裝對應版本,如果有ASP.NET Core 3.1,則安裝3.1版本的庫)


然後,在配置服務中:


services.AddControllers().AddNewtonsoftJson(x => 

 x.SerializerSettings.ReferenceLoopHandling = Newtonsoft.Json.ReferenceLoopHandling.Ignore);


異常的改善: 指定的路徑、檔名,或是兩者都太長。完整的檔名必須少於 260 個字元,並且目錄名稱必須少於 248 個字元

在 VS2019 中發行網站時出現錯誤 "指定的路徑、檔名,或是兩者都太長。完整的檔名必須少於 260 個字元,並且目錄名稱必須少於 248 個字元。", 造成發佈失敗。


解決方法:

修改環境變數 TEMP 及 TMP 為 C:\TEMP ,獲得改善。

不一定要用路徑 C:\TEMP, 但是要儘量的簡短。

iTextsharp barcode example

iText : v5.5.13.2
protected void submitPdf_Click(object sender, EventArgs e) {
	BarCodeGenerate();
}

/// 
/// Generates the new page with barcode128.
/// 
public void BarCodeGenerate() {
	Document doc = new Document(PageSize.A4.Rotate(), 50, 50, 20, 20);
	PdfWriter writer = PdfWriter.GetInstance(doc, new FileStream(@"c:\temp\BarCodeQRCode.pdf", FileMode.Create));
	doc.Open();
	PdfContentByte cb = writer.DirectContent;
	PdfContentByte cb39 = writer.DirectContent;

	Paragraph pa = new Paragraph();
	Barcode128 barcode = new Barcode128();
	barcode.CodeType = Barcode.CODE128_UCC;
	barcode.Code = "hello barcode - code128";
	iTextSharp.text.Image barcodeImage = barcode.CreateImageWithBarcode(cb, null, null);
	barcodeImage.ScalePercent(100f);
	barcodeImage.Alignment = Element.ALIGN_CENTER;
	pa.Add(barcodeImage);

	BaseFont fontChinese = BaseFont.CreateFont("C:/Windows/Fonts/STSONG.TTF", BaseFont.IDENTITY_H, BaseFont.EMBEDDED);
	Font normalFont = new Font(fontChinese, 12);

	//float[] w = { 5f, 15f, 6f, 10f };
	float[] w = {
			Convert.ToSingle(PageSize.A4.Width * 0.4),
			Convert.ToSingle(PageSize.A4.Width * 0.3),
			Convert.ToSingle(PageSize.A4.Width * 0.3)
		};
	PdfPTable table = new PdfPTable(w);
	table.DefaultCell.Border = iTextSharp.text.Rectangle.NO_BORDER;
	table.DefaultCell.BorderWidth = 0;
	table.DefaultCell.BorderColor = new BaseColor(0, 0, 0);
	table.DefaultCell.Padding = 4;
	table.DefaultCell.SpaceCharRatio = 4;
	table.WidthPercentage = 100;
	table.DefaultCell.HorizontalAlignment = iTextSharp.text.Element.ALIGN_LEFT;

	PdfPCell cell = new PdfPCell(new Phrase("Create a table with all default settings"));
	cell.Border = Rectangle.TOP_BORDER + Rectangle.BOTTOM_BORDER + Rectangle.LEFT_BORDER + Rectangle.RIGHT_BORDER;
	cell.HorizontalAlignment = Rectangle.ALIGN_CENTER;
	table.AddCell(cell);

	var aa = new Paragraph("aaa", normalFont);

	cell = new PdfPCell(new Phrase("Create a table 中文字的測試with all default settings", normalFont));
	cell.Border = Rectangle.TOP_BORDER + Rectangle.BOTTOM_BORDER + Rectangle.LEFT_BORDER + Rectangle.RIGHT_BORDER;
	cell.HorizontalAlignment = Rectangle.ALIGN_CENTER;
	table.AddCell(cell);

	cell = new PdfPCell(new Phrase("Create a table with all default settings"));
	cell.Border = Rectangle.TOP_BORDER + Rectangle.BOTTOM_BORDER + Rectangle.LEFT_BORDER + Rectangle.RIGHT_BORDER;
	cell.HorizontalAlignment = Rectangle.ALIGN_CENTER;
	table.AddCell(cell);

	cell = new PdfPCell(new Phrase("Create a table with all default settings"));
	cell.Border = Rectangle.TOP_BORDER + Rectangle.BOTTOM_BORDER + Rectangle.LEFT_BORDER + Rectangle.RIGHT_BORDER;
	cell.HorizontalAlignment = Rectangle.ALIGN_CENTER;
	table.AddCell(cell);
	doc.Add(table);


	float[] w2 = {
			Convert.ToSingle(PageSize.A4.Width * 0.4),
			Convert.ToSingle(PageSize.A4.Width * 0.2),
			Convert.ToSingle(PageSize.A4.Width * 0.1),
			Convert.ToSingle(PageSize.A4.Width * 0.3)
		};

	//float[] w2 = { 25f, 15f, 30f, 10f };
	table = new PdfPTable(w2);
	table.WidthPercentage = 100;

	cell = new PdfPCell(new Phrase("Create a table with all default settings"));
	cell.Border = Rectangle.TOP_BORDER + Rectangle.BOTTOM_BORDER + Rectangle.LEFT_BORDER + Rectangle.RIGHT_BORDER;
	cell.HorizontalAlignment = Rectangle.ALIGN_CENTER;
	//cell.FixedHeight = 10f;
	table.AddCell(cell);

	cell = new PdfPCell(barcodeImage, true);
	cell.Border = Rectangle.TOP_BORDER + Rectangle.BOTTOM_BORDER + Rectangle.LEFT_BORDER + Rectangle.RIGHT_BORDER;
	cell.HorizontalAlignment = Rectangle.ALIGN_CENTER;
	cell.Padding = 5f;
	//cell.FixedHeight = 10f;
	table.AddCell(cell);

	cell = new PdfPCell(new Phrase("Create a table with all default settings"));
	cell.Border = Rectangle.TOP_BORDER + Rectangle.BOTTOM_BORDER + Rectangle.LEFT_BORDER + Rectangle.RIGHT_BORDER;
	cell.HorizontalAlignment = Rectangle.ALIGN_CENTER;
	//cell.FixedHeight = 10f;
	table.AddCell(cell);

	cell = new PdfPCell(new Phrase("Create a table with all default settings"));
	cell.Border = Rectangle.TOP_BORDER + Rectangle.BOTTOM_BORDER + Rectangle.LEFT_BORDER + Rectangle.RIGHT_BORDER;
	cell.HorizontalAlignment = Rectangle.ALIGN_CENTER;
	//cell.FixedHeight = 10f;
	table.AddCell(cell);

	doc.Add(table);

	Barcode39 code39 = new Barcode39();
	code39.Code = "314159265";
	//code39.CodeType = Barcode.CODE128_UCC;
	code39.StartStopText = true;
	code39.GenerateChecksum = true;
	code39.Extended = true;
	iTextSharp.text.Image code39Image = code39.CreateImageWithBarcode(cb39, null, null);
	//iTextSharp.text.Image code39Image = code39.CreateDrawingImage(System.Drawing.Color.Black, System.Drawing.Color.White);
	pa.Add(code39Image);


	cell = new PdfPCell(new Phrase("Create a table with all default settings"));
	cell.Border = Rectangle.TOP_BORDER + Rectangle.BOTTOM_BORDER + Rectangle.LEFT_BORDER + Rectangle.RIGHT_BORDER;
	cell.HorizontalAlignment = Rectangle.ALIGN_CENTER;
	//cell.FixedHeight = 10f;
	table.AddCell(cell);

	cell = new PdfPCell(code39Image, true);
	cell.Border = Rectangle.TOP_BORDER + Rectangle.BOTTOM_BORDER + Rectangle.LEFT_BORDER + Rectangle.RIGHT_BORDER;
	cell.HorizontalAlignment = Rectangle.ALIGN_CENTER;
	cell.Padding = 5f;
	//cell.FixedHeight = 10f;
	table.AddCell(cell);

	cell = new PdfPCell(new Phrase("Create a table with all default settings"));
	cell.Border = Rectangle.TOP_BORDER + Rectangle.BOTTOM_BORDER + Rectangle.LEFT_BORDER + Rectangle.RIGHT_BORDER;
	cell.HorizontalAlignment = Rectangle.ALIGN_CENTER;
	//cell.FixedHeight = 10f;
	table.AddCell(cell);

	cell = new PdfPCell(new Phrase("Create a table with all default settings"));
	cell.Border = Rectangle.TOP_BORDER + Rectangle.BOTTOM_BORDER + Rectangle.LEFT_BORDER + Rectangle.RIGHT_BORDER;
	cell.HorizontalAlignment = Rectangle.ALIGN_CENTER;
	//cell.FixedHeight = 10f;
	table.AddCell(cell);

	table.AddCell(cell);
	doc.Add(table);
	table.AddCell(cell);
	doc.Add(table);
	table.AddCell(cell);
	doc.Add(table);


	code39.StartStopText = true;
	code39.GenerateChecksum = false;
	code39.Extended = true;
	code39Image = code39.CreateImageWithBarcode(cb39, null, null);
	pa.Add(code39Image);

	table.AddCell(cell);
	doc.Add(table);
	table.AddCell(cell);
	doc.Add(table);
	table.AddCell(cell);
	doc.Add(table);

	BarcodeQRCode qrcode = new BarcodeQRCode("hello barcode - QrCode", 100, 100, null);
	iTextSharp.text.Image grImage = qrcode.GetImage();
	pa.Add(grImage);


	/*
	https://dotblogs.com.tw/kevinya/2016/01/13/104010

	由於 iTextSharp 內建的 QRCode 類別對於中文內容的支援度較差,
	需經過幾道 override 的程序改寫才可存中文,所以在此直接採用
	第三方元件 MessagingToolkit.QRCode。

	利用此第三方元件的QRCodeEncoder物件即可產生QRCode的點陣圖Bitmap,
	再將bitmap轉換成iTextSharp.text.Image即可加入到pdf之中:

		QRCodeEncoder chtEncoder = new QRCodeEncoder();
		//第三方先產生bitmap
		Bitmap qrBitmap1 = chtEncoder.Encode("qrcode裝中文內容"); //將內容轉碼成 QR code            
		//再將bitmap轉換成iTextSharp.text.Image
		iTextSharp.text.Image qrImage1 = iTextSharp.text.Image.GetInstance(qrBitmap1, BaseColor.BLACK);
		qrImage1.ScalePercent(50);
		qrImage1.Alignment = Element.ALIGN_RIGHT;//透過Image.Alignment來設定靠左靠右
		pa.Add(qrImage1);
		doc.Add(pa);
		doc.Close();

	*/

	doc.Add(pa);

	doc.Close();
}